7/31/2005 - One thing chess can teach you about life is that no matter how hopeless a situation seems, sometimes there just might be a solution out there that you can live with. Chess teaches you to use all the resources seen and unseen at your disposal. Chess teaches you to come up with flexible plans. In fact chess teaches you to have multiple plans. The key to chess is to produce multiple threats. I got the following position from ICC Problembot. With white to move, at first glance, I thought this position was hopeless. It’s common knowledge in chess that connected pass pawns on the sixth rank (or for black on the 2nd rank) can defeat most rooks. These pawns are usually unstoppable. However, white, with his king and rook, does have a slim chance to deliver checkmate if his opponent is not sharp. But it looks as though the checkmate chances will run out once the black king gets to h2. However that is where the real fun begins.
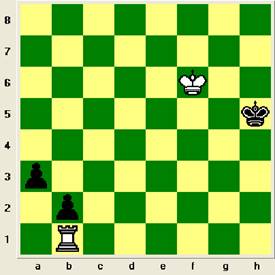
The position above does look helpless. Some players might
resign here, but my feeling is that while your position sill has some fight
left in it, continue to struggle. I said to my self, well let’s go for it;
maybe we can mate this sucker. So I played 1. Kf5, with the threat of mate
in one with Rh1. My opponent is no slouch so he played 1… Kh4 to thwart the
mate. I continued the mating threats with 2. Kf4. My opponent played 2… Kh3,
his thinking that the mating threats would run out once the
black king go to h2. So I responded with 3. Kf3 and again my opponent
thwarted the mate with 3.. Kh2.
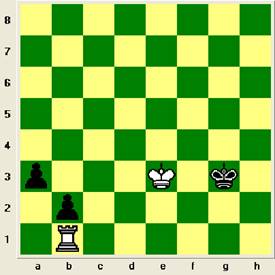
The following position arose after 1.Kf5 Kh4, 2. Kf4 Kh3 3.Kf3 Kh2: Notice
it is white to move. If it was black to move, black would be in zugzwang and
would lose.
|
|

Now the above position truly looks hopeless now for white. White can no longer threaten mate. Should white play 1. Kf2 then black wins with 1..a2 and the a-pawn will queen. How can white save this game? He must come up with a real flexible plan now. The white king is too far away to help the rook out to prevent a queening. However, how can black queen a pawn? He can’t play a2 now, because that would allow the white rook to take the b-pawn with a tempo saving check. This would buy the time for the white rook to grab the a2 pawn. The sequence would go like this 1.. a2 2. Rxb2+ Kh3 3. Rxa2 and white now wins this game. So white now realizes that if black advances his a2-pawn prematurely, he will lose both of them. Black cannot advance the a-pawn while his king is on the 2nd rank. White also can’t block the 2nd rank with Kf2, because this would allow the a2 advance and block the tempo saving check on Rxb2. White also can’t move his rook off of the b1-square, should he do so this would allow the a2-advance and black would queen a pawn. So white can use this knowledge to find the only move that will save this game. White must play 1.Ke3. This move brings the king closer to the black passers. If black allows this to continue the white king will be able to aid his rook and attack both outsider passers. Now Black has to be careful, he must keep his threats of queening alive or he could lose this game. Black knows that in order to advance his a-pawn with impunity he must move his king off the 2nd rank thus allowing the a2 advance without fear of white's tempo, game saving move Rxb2+. Upon a a2-advance, black can't allow white to take b2 with check. Black can play Kh3, but then white will simply threaten mate with Kf3 with the threat of Rh1 mate. So black must play 1.. Kg3.
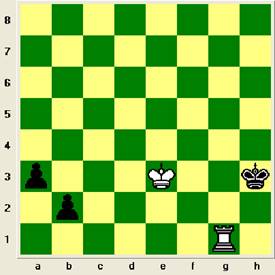
Position after 1. Ke3 Kg3:
|
|
In the above position the ball is now in white's court. Black threatens
to play the a2-advance with impunity. White no longer has the tempo saving
check on Rxb2. White should notice that black doesn’t have many king
moves available to him. White must think about driving black’s king back to
the h-file with move Rg1+. White must make use of the dual threats of mate
and of the tempo saving check Rxb2 upon an a2-advance. So white must play
1.Rg1+ here. Should black play Kh4 or Kh3, keeping with the idea of keeping
the king off of the 2nd rank thus allowing the a2-advance, then
white will use the threat of mate with either Kf4 or Kf3, with Rh1 mate to
follow. Blacks only other choice is to play Kg2 or Kh2. Should this occur
than white will return his rook to b1 and make use of the tempo saving
threat Rxb2 check upon an a2-advance.
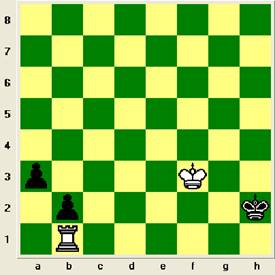
Position after 1. Rg1+ Kh3:
|
|
In the above position, since the black king is off the 2nd
rank and the white rook is no longer on b1, white cannot prevent the
a2-advance with Rb1 now. White must use threat of mate here and responds
with Kf3 threatening mate with Rh1. In order to secure the draw, Black
must move his king up the
board, with Kh4. White’s king must follow suit with Kf4 and continue the mating
threat of Rh1.
Black's only other response to Kf3 is to return his king to the 2nd
rank with Kh2 thus attacking whites rook and threatening the a2-advance as
well. Black would be counting on a repeat of the 2nd position above. White would
be forced to play Rb1 activating the Rxb2+ tempo saving move upon the
a2-advance.
So after 1. Kf3 Kh2, 2. Rb1 the 2nd position above is repeated with one major difference. It it is black on the move and black is in zugzwang. It's black to move and lose. Black is faced with Kh3 leading to mate Rh1 mate. Black's other option is the a2-advance, which allows the Rxb2 tempo saving check.
|
|
Thanks be to God and go in peace.